What do you think?
When I read that Blogger was introducing the possibility of wider columns, I jumped. I liked the dignified look but couldn't keep it with the new design.
Does anyone care?
AHA! Figured out how to change the width and keep the dignified look and previous colours. I had to say goodbye to the bolts in the background.
Monday, March 29, 2010
Saturday, March 27, 2010
Quick & dirty - muslins
So I cut the Vogue 2770 top out of cotton muslin and have quickly stitched it together. Based on the flat pattern measurements I decided to cut a size 8. It fits, sort of. But I will adjust the pattern pieces to do a better job of fitting me.
The pattern has princess seams which do not pass over the bust point but rather to the sides, by approximately 5cm (2"). This means that there is no dart or seam shaping that aims directly at the point that most needs it, and it's a bit tight there. At the same time, the V neck is too long for my frame which causes gapping in the upper chest area. And there is too much width through the upper chest.
I am going to take a wedge-shaped tuck through the upper front to take the length out of the V neck. I am also going to figure out what kind of dart is needed to remove the width from the upper front, and I think I'm going to add a small amount of length over the bust, which I'll ease into the side front piece.
Before:


Hugely gappy neckline! It's too long
At the back, there are little "wings" of fabric at the armscye.

Here you can see the excess fabric at the princess seam line. The CF piece is too wide.
After:

The excess length in the neckline is pinned out in a long wedge. The excess at the seamline is pinned in a fisheye shape.
 In the back, I've pinned out the little "wing". I'll shorten the side back and take the extra length out of the shoulder seam in the CB piece.
Next task: transfer these changes to the pattern. Stay tuned.
The pattern has princess seams which do not pass over the bust point but rather to the sides, by approximately 5cm (2"). This means that there is no dart or seam shaping that aims directly at the point that most needs it, and it's a bit tight there. At the same time, the V neck is too long for my frame which causes gapping in the upper chest area. And there is too much width through the upper chest.
I am going to take a wedge-shaped tuck through the upper front to take the length out of the V neck. I am also going to figure out what kind of dart is needed to remove the width from the upper front, and I think I'm going to add a small amount of length over the bust, which I'll ease into the side front piece.
Before:
Hugely gappy neckline! It's too long
At the back, there are little "wings" of fabric at the armscye.
Here you can see the excess fabric at the princess seam line. The CF piece is too wide.
After:
The excess length in the neckline is pinned out in a long wedge. The excess at the seamline is pinned in a fisheye shape.
Next task: transfer these changes to the pattern. Stay tuned.
Tuesday, March 23, 2010
Patterns from my past ... continued
I'm tired tonight - apparently too tired to sew a Q&D muslin of Vogue 2770. Again I find myself aimlessly trolling for vintage patterns. Tonight I'm looking at MomsPatterns. I like this site because it's well-organized, and the thumbnail photos are a decent size.
I came across a pattern from the late 1960s or early 1970s with a little drop waisted skirt (either pleated or flared) and had an almost visceral memory of a dress made from some sort of sleazy nylon print of the type that was de rigeur when I was in high school, in cheery red, white & blue. I'd swear I never actually owned the pattern that prompted this reaction but I'll work on the memory and see if it sharpens any.
Anyone who looks at these sites regularly knows that some patterns turn up over and over while others live on only in one's memory. Obviously the common ones were big sellers in their day. Some of my past patterns must have been relatively unpopular (perhaps I had off-beat taste) because they are still eluding me. However, in the offerings for this month, there are two copies of this old chestnut, which I remember making.
 Quick! It's only $6.50 (size young junior teen, 11/12). I made it when I was in grade 9, I think. The future Sewing Lawyer chose to make the vest and simple, A-line skirt in a stunning coral-orange hi-lo corduroy. I think I wore it until the pile came through to the wrong side, I loved it so much. Who'd have thought that coral corduroy would be so versatile? (Maybe it presaged my current orange kick...)

Another pattern that's frequently spotted on the vintage sites is Simplicity 6895. Now this is one that never made it into my sewing room, but I'm still pining for its close contemporary that did - I'm pretty sure it was the same "Designer Fashion" run of patterns, and had the same model (wasn't she just gorgeous?). Shown in teal, it was a wide-lapelled pantsuit with the waist drawn in through wide elastic sewn through 2 parallel channels. Sigh... I'd make it again in a flash, if only I could find it.

Finally for tonight, here's one I still have (thankfully, since like so many others of my past, it has never appeared to me on the vintage sites). I think view B would be a good choice for a casual summer shirt in 2010 - do you agree?
I came across a pattern from the late 1960s or early 1970s with a little drop waisted skirt (either pleated or flared) and had an almost visceral memory of a dress made from some sort of sleazy nylon print of the type that was de rigeur when I was in high school, in cheery red, white & blue. I'd swear I never actually owned the pattern that prompted this reaction but I'll work on the memory and see if it sharpens any.
Anyone who looks at these sites regularly knows that some patterns turn up over and over while others live on only in one's memory. Obviously the common ones were big sellers in their day. Some of my past patterns must have been relatively unpopular (perhaps I had off-beat taste) because they are still eluding me. However, in the offerings for this month, there are two copies of this old chestnut, which I remember making.
Another pattern that's frequently spotted on the vintage sites is Simplicity 6895. Now this is one that never made it into my sewing room, but I'm still pining for its close contemporary that did - I'm pretty sure it was the same "Designer Fashion" run of patterns, and had the same model (wasn't she just gorgeous?). Shown in teal, it was a wide-lapelled pantsuit with the waist drawn in through wide elastic sewn through 2 parallel channels. Sigh... I'd make it again in a flash, if only I could find it.

Finally for tonight, here's one I still have (thankfully, since like so many others of my past, it has never appeared to me on the vintage sites). I think view B would be a good choice for a casual summer shirt in 2010 - do you agree?
Sunday, March 21, 2010
Interrupting the stream of sewing...
Here's an instant-gratification project. It's nice to be able to take something from flat folds to finished garment in a few hours. This is my second version of Jalie 2794, an all-round favorite on Pattern Review with (as of today) 58 reviews. It was chosen as a "Best Pattern of 2008" and is in the "Hall of Fame 2009" (a prior year's "best of" with lots of continuing positive reviews).
There's not much more to say.


Except, of course, that I made it to coordinate with my orange plaid jacket & black skirt.
Back to my muslins...
There's not much more to say.
Except, of course, that I made it to coordinate with my orange plaid jacket & black skirt.
Back to my muslins...
Saturday, March 20, 2010
Next up ...
For years I have not had this problem - a gaping hole in my sewing calendar. What on earth will I make next, I have been wondering more and more frantically. Meanwhile, I've been marking sewing time by tracing patterns from a Burda magazine I stupidly did not buy but was able to borrow from DIGS, who clearly never has a hole in her sewing calendar. (I'm finished with them now DIGS, what about that lunch date where I'll return them?)
I know what I want to make it out of, at least.

I know, I previously announced to the blogosphere that the multi-yarned and slightly slubby black/camel/cream wool blend fabric wanted to be a double-breasted, stand collar jacket from Burda Magazine. I've been wrestling with that idea for a week or so. The clean lines work, but I worry that the double-breasted jacket will be less versatile, and that the high neck would mean I'd not want to wear it in spring and fall but only deepest winter. I want a jacket I can wear right away.
Also, I failed to convince my husband that the style was right for the fabric. He doesn't always have (or at least express) an opinion. So I started to doubt my fabric's intentions, and the wisdom of that pattern for a jacket to be made in March.
Naturally I have thousands (only a slight exaggeration) of jacket patterns, including an entire shelf of miscellaneous issues of Burda WOF (I have never subscribed but pick it up from time to time). Nothing seemed right. And then I lit on this Vogue Tamotsu pattern, now out of print but still available on the Vogue website. AHA. Clean lines, single breasted, interesting collar action, vaguely fits my husband's sense that the fabric might be happy in a Japanese-y style.

I know, the lines are impossible to see (why do pattern companies do this?) so here are the line drawings for the jacket.
 I'll have to monkey with the sleeves since I'm pretty sure the shoulders will be too extended (this dates from 2003 and calls for 1/2" shoulder pads). However, I bought the pattern for the neckline and it'll work really well with the fabric.
Oh, it also has spousal approval.
I also need plans for the 4 season camel Italian wool which I dug out of the stash. Something to go with the jacket, but what? I have 4 metres (lots). Ideas anyone?
I know what I want to make it out of, at least.
I know, I previously announced to the blogosphere that the multi-yarned and slightly slubby black/camel/cream wool blend fabric wanted to be a double-breasted, stand collar jacket from Burda Magazine. I've been wrestling with that idea for a week or so. The clean lines work, but I worry that the double-breasted jacket will be less versatile, and that the high neck would mean I'd not want to wear it in spring and fall but only deepest winter. I want a jacket I can wear right away.
Also, I failed to convince my husband that the style was right for the fabric. He doesn't always have (or at least express) an opinion. So I started to doubt my fabric's intentions, and the wisdom of that pattern for a jacket to be made in March.
Naturally I have thousands (only a slight exaggeration) of jacket patterns, including an entire shelf of miscellaneous issues of Burda WOF (I have never subscribed but pick it up from time to time). Nothing seemed right. And then I lit on this Vogue Tamotsu pattern, now out of print but still available on the Vogue website. AHA. Clean lines, single breasted, interesting collar action, vaguely fits my husband's sense that the fabric might be happy in a Japanese-y style.
I know, the lines are impossible to see (why do pattern companies do this?) so here are the line drawings for the jacket.
Oh, it also has spousal approval.
I also need plans for the 4 season camel Italian wool which I dug out of the stash. Something to go with the jacket, but what? I have 4 metres (lots). Ideas anyone?
Saturday, March 13, 2010
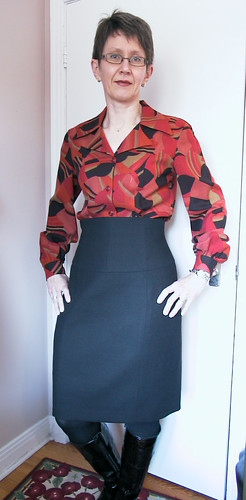
Black high-waisted pencil skirt & lined vent tutorial
This is based on skirt #112 from the January, 2009 issue of Burda WOF as it then was. For some reason, even though the pattern is more than a year old, it didn't get reviewed a lot until very recently. As of this moment, there are 7 reviews on PR (mine to come shortly) plus Christa's review of related skirt #113. It's a winner!
However, I Frankenpatterned the skirt - only the waist pieces come from Burda - the rest is a version of my PMB (PatternMaster Boutique) princess seamed skirt. My shape doesn't do well with a 2 seamed pencil skirt because there are 2 sizes difference between my waist and hip measurements, plus I have (ahem) "athletic" thighs. Trust me - plain skirt patterns and my lower half do not play well together. The princess seams, on the other hand, provide plenty of opportunities for subtle shaping including pegging the hem. I think I'll be making some version or other of this skirt for the rest of my days.
My first step was to muslin the waistband pieces. This has plenty of places for fit alterations too - since it comprises a total of 8 pieces. I found it fit at the waist, but was a little too exaggerated above the waist at the side seams and side-back seams, and a little too snug as it flared to go over the hip. My goal was to have the waistband follow my shape and not be tight anywhere. The needed adjustments were easy.
Once I had altered these pieces I did the necessary changes to my PMB pattern. This mostly involved moving the princess seams so they would intersect the seams in the waistband.
Then I made a muslin of the skirt to check that the fit was as good as expected. Imagine how chuffed I was to realize that my working out (with a personal trainer) since September is paying off - I had to take it in quite a bit. The muslin also let me check the length. This one is shorter than most of my other skirts, at 57cm (about 22.5") below the waist. It hits me just above mid-knee.
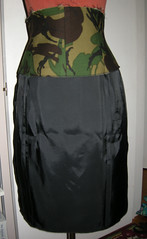
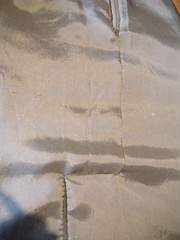
I already mentioned I was going to bone the waistband. Actually, I decided to go all couture and create an inner structure or corset to hold the boning and give structure to the entire waistband, underline the skirt with silk organza, and fully line it with Bemberg, including a properly-finished back vent.

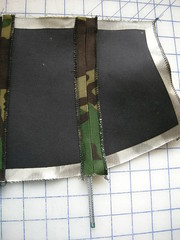
This inner corset thingy was then basted to the constructed lining at the top and centre-back. The lower edge hangs free. If I ever decide that the boning is too much, I'll easily be able to remove it.
Below is a photo of the lining with corset attached.
Construction of the skirt itself was uneventful. There are only a couple of things to note. I used Italian black wool crepe (acquired for a song at the Fabric Flea Market, 2009). I interfaced the waistband but with a light and lofty type of fusible. This is more for cushioning the fairly thin wool crepe over the skirt innards than for actual structure.
The skirt pieces I underlined with silk organza. I find this provides a little crispness to a wool crepe skirt. It means the skirt will crease less and that creases will fall out faster. Further, having underlining means you can sew a hem and vent which are truly invisible because all the stitches holding them in place are in the organza only and don't touch the fashion fabric.
I used a long invisible zipper since a standard skirt-length zip would have been too short given the high waist. I left it a generous length (28cm or 11") and this makes such a huge difference in terms of ease of getting into and out of the skirt that I may always do it in skirts from now on.
In attaching the lining to the skirt at the waist and zip, the lining/corset layer is treated as one (just as if it was only lining).
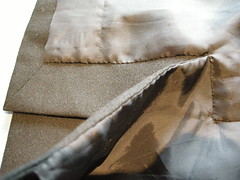
At the hem there is a vent at CB which I lined "properly".

Notice as well that I pressed back the edge of the vent underlap, and that the overlap is mitered at the hem.
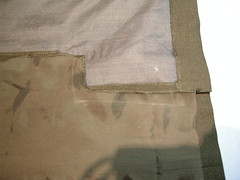

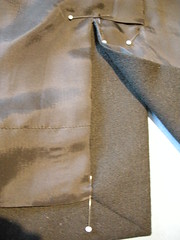
Then invisibly hand-sew the lining to the vent edges, and across the top of the vent.

In the final picture you can see the little bubble of extra length, just above the top of the lined vent.
And here are some more photos of the finished skirt:

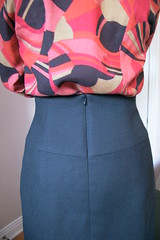


And last but not least: With the famous Orange Plaid Jacket!
This skirt should make a very versatile addition to The Sewing Lawyer's wardrobe - so far (judging by the fact I've been sitting in it while I wrote this blog entry) it's comfortable as well as (if I do say so myself) rather good-looking.
Subscribe to:
Posts (Atom)


