Sunday, September 30, 2012

Fits and starts

I've changed my mind about the trim for my Chanel-ish jacket, AGAIN.  However, it's more a refinement of the idea I told you about last week using the shredded sari yarn.

Since a picture is worth 1,000 words, regard:

Before - too acid
After - different light conditions but
you can see that the turquoise
calms the trim down, colour-wise
 My husband observed that the reds and yellows in the sari yarn are too acidic for the fabric and suggested mixing in another yarn.

So I went deep into yarn stash, tried some different yarns and eventually decided that a smooth bright turquoise yarn (no bouclĂ©, no hairy bits) worked.  Best of all, it emphasizes the turquoise in the fabric and coordinates really well with my recently-completed turquoise wool dress which I will wear with this jacket, if it ever gets finished.  Win!

In other news I received V1324 in the mail recently and I have a skirt length of cashmere that wants to be this skirt.  Its calling for attention and the lovely lines of the skirt temporarily distracted me from my jacket project.

I dutifully checked the printed info on the pattern re finished dimensions at waist and hip and cut the pattern halfway between 8 and 10 at the waist and graded to a 12 at the hip level.  Then I sewed it up in lovely cotton muslin.

I destroyed the evidence of the first version by immediately letting out all the seams at the hip so I could (a) walk and (b) sit down while wearing it.  The circumference was fine at the waist and high hip.  But it's very severely pegged below the hip level.  Not a good look for The Sewing Lawyer, or probably for anyone on the hourglass end of figures who wants to be able to (a) walk and (b) sit down in their clothes.

So here's the muslin once let out.  I should say I went a bit overboard with the letting out and will be smoothing out the seams at hip level in the next muslin.  (Yes this is a 2 muslin project.)

A side view reveals a problem with the front. The darts are too large and the result is too much fabric released at around crotch level in front.

I took my muslin and the pattern pieces to my sewing group meeting yesterday and asked for ideas.  My friend Carroll commented that the front looked like it was too long and suggested that I take a horizontal tuck of about .5" at CF, tapering to nothing at the side of the piece.  This seemed to do wonders for the pooching which is not a problem of too much width, exactly.

So here are my altered pattern pieces.

Front
I realized I could kill two birds with a single stone by slashing the pattern piece for the front horizontally just below the dart (as originally marked) and slashing through the dart before taking out the extra length.  I could maintain the straight CF line and the width of the skirt front at the waist but reduce the dart take up.

I hope you can see in the picture at right that the upper right part of the piece got shifted straight down (keeping the CF perfectly straight), while the upper left part is hinged down at an angle, making the dart smaller.  The side of the piece remains the same length.  The CF length is shortened by about .5".

Back
To the left is the back piece which is rather strange. The pointy bit at its upper right wraps around to the front and attaches to the angled part of the front piece, above the somewhat rocket-shaped side piece.
Side piece - right side is front

I wasn't sure if it would work if I changed the angle by grading out to a much bigger size, but it seems to have been fine.

My slightly refined letting out consists of adding 5/8" (1.5cm) at each seam (split between the two pieces) which adds a total of 2.5" (6cm) at the hem.  I need the extra at the front thigh.  In the back I added the extra width lower down.

I question whether this skirt as designed is wearable by anyone who has hips/thighs thicker than matchsticks if it's made in a woven (Vogue says wool doubleknit would work but the other recommended fabrics are not stretchy).

I wonder if my adjustments are akin to those the couture fashion houses would perform to make outlandish runway clothes wearable by real people.


Sunday, September 23, 2012

The Sewing Lawyer in her natural habitat

Working on V8804.

In other news, I cleaned up my sewing room.  In part this consisted of bowing to the inevitable (I have too much fabric) and buying new plastic storage bins.  But I also moved many large cumbersome items out of the sewing room (small, crowded) and into the newly vacated room next door.  I'm hoping to get a handle on it all before it too becomes hopelessly crowded with stuff.

I'm liking being able to see the floor again.

But the most exciting thing is, I've fixed on how to trim my jacket.  I found the perfect yarn to fabricate my own trim.

This stuff is just amazing - it's made from shredded silk sari fabric, which is then spun somewhat haphazardly into this wild, hairy twist of glorious, vibrant colour.

Before finding it, I was toying with the idea of a single strip of fuchsia velvet ribbon.  Which, despite the colour, would have been rather restrained.  I was considering trying to ruche it or something, but I wasn't very enthusiastic.


When I saw the recycled sari yarn, I figured the fuchsia velvet ribbon could be incorporated into a rustic crocheted trim.  I tried weaving it through a chain.                                                  

Ummm no.

Then I tried adding a strip of single crochet down one side.

No again.


Then I tried a firmer chain (had to go out and buy a new fat crochet hook for the purpose).

Ah, yes, I think this may be it.

Hoping you agree!

Sunday, September 16, 2012

Where I'm at

Real life intervened in the sewing of the V8804 Chanel jacket, as driving 1,000 KM and helping no. 1 son get settled into his first apartment robbed The Sewing Lawyer of a valuable weekend for stitching activities.  (The payoff will come in future months as said son's childhood bedroom is taken over to be mine, mine, MINE! minimally redecorated to be suitable for use as a sewing studio.)

As well, interference came in the form of a couple of knitting projects ... small ones.  I'm trying to make knitting a way to occupy breaks from sewing, rather than the alternative.  I think it's going to take some time.  

So, how are those socks going anyway?

Here's the one complete one for my MIL, otherwise known as the sock from hell.  This because it insisted on being started three times, if memory serves (though I'm trying to forget) because each time it was too large.  And at least once because I messed up the heel (though I only frogged back to the beginning of the heel, not to the bitter beginning).  I'm almost to the heel (starting toe up) on sock #2, and so far it is much more cooperative than its sibling.  I'm quite smitten with the eye of partridge stitch for the heel.  Very cushy.

Yes, it's an unusual shape.  She is plagued with swollen feet and ankles.

And here's the first one of my own pair.

Both are based on the "upstream architecture" from Cat Bordhi's brilliant exposĂ© on how to knit socks, New Pathways for Sock Knitters, Book 1.  Curiously, despite the fact that the main goal of this book is to reduce your dependence on actual patterns, my sock is presented as a complete pattern, which seems divorced from the underlying logic of the upstream model.  I almost got sucked into following it blindly which would have resulted in my making a sock that would have been too big for me.  Then I got over it, started thinking for myself, and saved it.  No frogging required! (Except when I made the exact same mistake on the heel that caused the frogging of the heel on the sock from hell...)

But now I'm back at it.  Back at the sewing, that is.  Knitting is for my breaks.

And I've started attaching the lining fabric to the front and back pieces, and even did all the afterthought darts in the fronts, shrinking the fashion fabric on the outside to match.

Afterthought bust dart
For those of you contemplating this pattern:  You do not need to treat the bust darts in the lining as afterthought darts (pinched in and sewn by hand as shown in steps 34 and 35 of the pattern instructions).  In fact you can't really treat them this way.  And it makes no sense.  You need those darts no matter what, and you will have had to figure out whether an adjustment is needed for fitting long before you get to this point.  Do yourself a favour.  Just sew them by machine while you are assembling the front lining pieces.

The vertical darts, however, have to be sewn as afterthought darts after you have machine-quilted the lining to the fashion fabric.  The pattern tissue has four of these in the back and one in each front, and you can make as many or as few of these as you need for fitting and as can be accommodated by shrinking your fashion fabric with steam.

Before - lining fabric is darted
After permanently attaching the lining fabric to the fashion fabric with machine stitching you pinch out a dart of the desired width in the lining only.  This is hand sewn with tiny fell stitches.  It makes a bubble in the fashion fabric, as at left.

Then you get the fabric all nice and hot and steamy, and pat, beg, and cajole it until its fibres shrink into the available space.

The flat plain at right is indeed the same piece (showing the same seam) as in the bubbly picture at left, but after I had whispered to it, begged it, steamed the heck out of it, patted it gently into place and finally gave it a good pressing.  In the distance you see the differently-shaped bust area.


The other progress made this weekend (so far) was to make Spanish snap buttonholes in the lining.  It's a marvelous thing to be able to make an elegant, functioning and reasonably sturdy buttonhole in a single non-reinforced layer of thin China silk lining.  If you haven't tried this yet, I recommend my copiously illustrated tutorial for the technique.

I finished the lining at the buttonholes WAY ahead of when Claire Shaeffer and Vogue thought I should tackle it (the very last think before sewing on the buttons), but these buttonholes could not be done after the jacket is finished.  And I think the Spanish snap buttonhole is a vast improvement on cutting a hole in your lining and then turning the edges under, finishing by a double round of slip stitches (steps 90-92).


Monday, September 3, 2012

Chanel, the quick and dirty version

Confessing that this is probably a wearable muslin.  I am using fusible instead of sew-in interfacing.  I serged the edges of all my pieces, because my fabric is very ravelly.  I am also not thread-tracing anything.

Don't tell anyone.


I have some much nicer wool for my next version of this jacket.  As for this fabric, well, let's just say that a crochet hook to pull the most egregious of the nubs and loose threads through to the side I've deemed to be the wrong side is The Sewing Lawyer's best friend.


That said, I am liking the look of my bound buttonholes.  See if you can spot them.  Hint:  There are 5, in a row down the middle.

Murphy was in the sewing room, however.  I did 3 perfect practice buttonholes yesterday, and 3 perfect ones today.  Guess which ones were not perfect?  That's right, the last 2 I tackled, the ones closest to the top, and therefore the most visible.

Fixed the top buttonhole
However, they are really invisible, aren't they?  I fixed the messy ones with some hand-stitches.

See?

I thought not.

A few more bits of information about V8804.

If you are worried about the printing error in the undersleeve, I don't think it's necessary.  Apparently the piece was supposed to be graded for the different sizes, but in the first printing the piece is a straight one-size (14, I believe).  The differences must be very minor because I have had no problem with the ungraded piece.

The back neck interfacing is marked with a bias grain line but in the printed instructions, it says that this piece (unlike the sleeve and body hem interfacing pieces) should be cut on the same grain as the main piece, i.e. not on the bias.  Claire Shaeffer herself (via FaceBook) says it doesn't really matter.  Really?  Then why so specific in the instructions?  I cut it on the straight grain.

The shaping in the fashion fabric is done by steam so that the outer layer mimics the inner one, in which darts are actually sewn.  By hand.  After the two layers are attached with the lines of machine quilting.  I haven't done this step yet.  I'll let you know if it's physically possible.

The only shaping done before the quilting step is the side seam bust darts, which are not actually darts, in the fashion fabric.  You do a dart stay in interfacing, and then ease the fabric to conform to it.

I secured the dart stay with machine stitching along the grain of the fashion fabric, figuring that it would be invisible.  It is.


Finally, please admire the constructed sleeve.  See the crazy grain placement?


Sunday, September 2, 2012

Bound buttonholes

I bought some different trim and buttons, but on getting my purchases home I'm not so taken with them, and I cannot convince anyone who has seen them on the fabric in real life (except the probably slightly biased owner of the shop in which I bought them).  So I took some time off my search for the perfect trim, and actually sewed instead - what a concept!

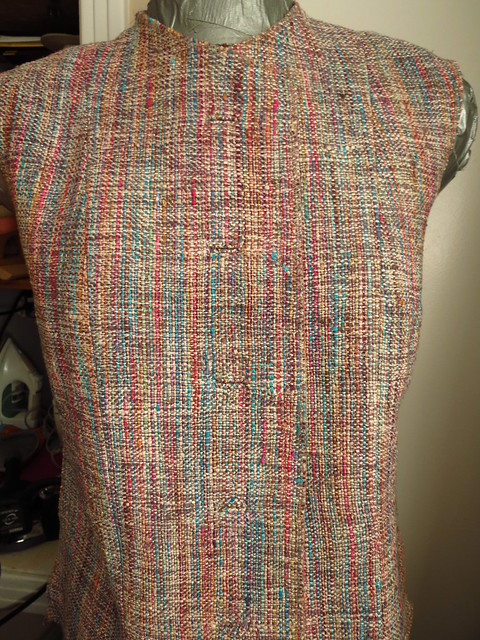
Let's play "spot the buttonholes"!
Since the placement of the buttonholes and CF on this pattern are dictated by the size of the buttons and trim intended, and since I intend to buy the right size, I figured I could go ahead and make the buttonholes.

Now this pattern calls for hand-worked buttonholes and The Sewing Lawyer has a confession to make. I have NEVER made a hand-worked buttonhole.  And from the start, a decision had been made that this jacket wasn't going to involve my first attempt.  However, I have made quite a few bound buttonholes and, despite departing from the Chanel path as taught in the extensive instructions in V8804, bound buttonholes will have to do, and in fact they will do just fine.

In fact, I just made three (practice) buttonholes, and took pictures.  Exhibit A, to the right.  What do you think?

So, my super-duper no-windows never-fail patch buttonhole tutorial follows.  (NB:  these instructions are slightly simpler than the tutorial I previously posted on Flickr.)

Step 1 - Marking

Carefully mark your buttonholes.  This involves several steps.  First, determine exactly how far from the edge of the piece each buttonhole should start, and exactly how long they will be, and exactly how far apart from each other they will be.  Mark these dimensions with pins.

Then, with a stitch length of 3 or 3.5 mm, mark the dimensions with thread.  I used a contrasting thread (black) which will be visible on both sides.  I stitched the practice buttonholes in black because I forgot to rethread my machine so you can see my stitching easier in this tutorial.  To sew the actual buttonholes, I'll switch to the right colour.

Double-check that your thread lines are in the right places!

A couple of other things to note about preparation.  The pattern calls for non-fusible interfacing for this piece and I am using a rather stiff silk organza rather than hair canvas or some other interfacing.  It's gray.  However, Claire Shaeffer suggests fusing a patch of interfacing at each buttonhole site.  Given the loose weave of my fabric, this was a must.  These patches are fused directly to the fashion fabric, so lie under the organza.

Then mark the long sides of the buttonhole.  On my sewing machine, I can move the needle R and L by 0.5mm increments.  This is an extremely useful feature for this part of the job.  I was able to align the presser foot so it was accurately centred on the originally-marked CL of the buttonhole, and sew a parallel line on each side, at the chosen distance away.

(NB my finger is there to highlight the needle position only!)

A word on buttonhole dimensions:  In The Sewing Lawyer's not-so-humble opinion, thick/fat bound buttonhole lips, especially if they are lumpy and/or uneven, scream "happy hands at home".  (A recent Threads article on bound buttonholes therefore made me wince - it's in #140 at p. 16, if you want to see what I mean.  I simply cannot believe that "industry" uses the method the author proposes, or would put up with the results pictured there...)  [Rant over]  The Sewing Lawyer says:  make your buttonholes as thin as possible given the characteristics of your fabric.  The thinner the fabric, the thinner you want the lips to be.  I moved my needle 5 clicks away from the CL, and the finished dimension of my buttonholes is 5mm or about 3/16".

After completing this step you can remove the basting marking the CL of the buttonhole; you don't need it anymore.


Step 2 - The patches

Cut bias patches that are bigger than the finished dimensions of the buttonhole - you will need approximately 1" (2.5cm) on either side and a bit more at the top and bottom.  Don't skimp.  The patches can be trimmed down to size after the buttonholes are sewn.  Centre the patches over the markings for the buttonholes, right sides together, and pin in place.

For my practice buttonholes, I decided to try using two different fusibles and to sew one buttonhole without any interfacing.  Don't ask me to tell you exactly what kind of interfacing they are - all I know is that the one with lines (on left) probably came from Fabricland.  I have no idea if they still sell it.  I fused so that the interfacing was most stable along the length of the buttonhole.


Step 3 - Sewing the patches

Working from the wrong side so you can see your thread markings, and using a small (2mm or so) stitch length, sew along the outer marked lines, backstitching as precisely as possible at the lines marking the end of the buttonholes.

I find it useful to stitch a hairs-width beside the basting rather than trying to sew directly on top of it.  This makes it SO much easier to remove the basting afterwards.

Speaking of which, you can now remove the lines of basting along the top and bottom edges of your buttonhole, and the CL basting too (if, like me, you didn't do so already).


Step 4 - Cutting etc.

Simple:  cut down the middle of the buttonhole, through all layers, but stopping short of the ends.  Then cut at an angle exactly into each corner, as close as you can without cutting through the stitching.  You should have little triangles at each end of the buttonhole.  You need these.

Then carefully pull the patch through the hole.  This is where I started to get a sense for whether I wanted interfacing (I do) and which one (the softest).

After you do this the buttonhole will look all weird and hopeless (from both sides).  It isn't.


Step 5 - Whispering to the buttonhole (with heat and steam)


The next step is to fold the patch back and press open the teensy little seam allowances in the seam along each edge of your buttonhole.  Finding them and holding them open for the iron may not be easy, but it can and must be done.  Use an awl if you have one.  Press FIRMLY, but just the sewn part of the patch.  Do the other side too.

The Sewing Lawyer's humble opinion:  This is the step that makes these buttonholes non-bulky and flat, and therefore what marks this method as superior.  When the lips (the patch) are folded back, one side of the open seam allowance is inside the buttonhole and the other is outside it.  Other methods open a window and leave ALL the SAs outside the actual buttonhole.  This means that the actual buttonhole is 2 layers of fabric but the surrounding area has 5 layers (jacket front, 2 layers of window SAs, 2 layers of lip fabric).  Lumpy!  Hard to press evenly!  Harder to avoid "happy hands at home" look!

Then flip your piece over and start manipulating the lips with both hands until they are evenly filling the rectangle.  Keep the little triangles folded back so the buttonhole retains its rectangular shape.  Once you have it how you like it, press it into position.  Be firm!  (I find it easiest to do this job on a sleeve roll or other pressing aid rather than on the flat ironing board.)

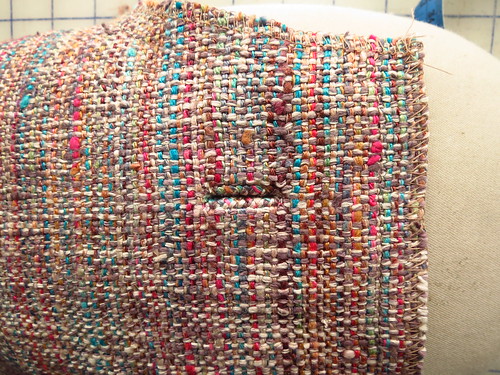
Step 6 - The pesky triangles


You have already pressed them into place.  The very last step is to secure the little triangles at each end of the buttonhole with stitching. To the left, you can see what they look like after being flattened.  Notice that the patch is pleated where it forms the lips.  VERY CAREFULLY transfer your pressed buttonhole over to the sewing machine.  Take care to preserve the pressed shape of the lips. With the right side up, fold the fashion fabric back, exposing the triangle and the patch.


Using a short stitch length, sew through all layers, as close as possible to the basting which marks the end of the buttonhole, and forms the base of the triangle. Sew back and forth to anchor all layers of the triangle to the patch.

After stitching, your patches look kind of strange from the back.  The only visible stitching relates to the triangles.  This will be covered up (and would in any case be practically invisible if I'd used the right colour of thread) by the facing.

At left you can see what the interfacing did.  The top patch (uninterfaced) is very soft and draws in.  The middle one (firmest interfacing) is almost square.  The lowest retains the softness of the fabric, but is more stable.  I like it best.


That's all there is to it.  Now, I have to replicate these excellent results five more times...  Wish me luck!
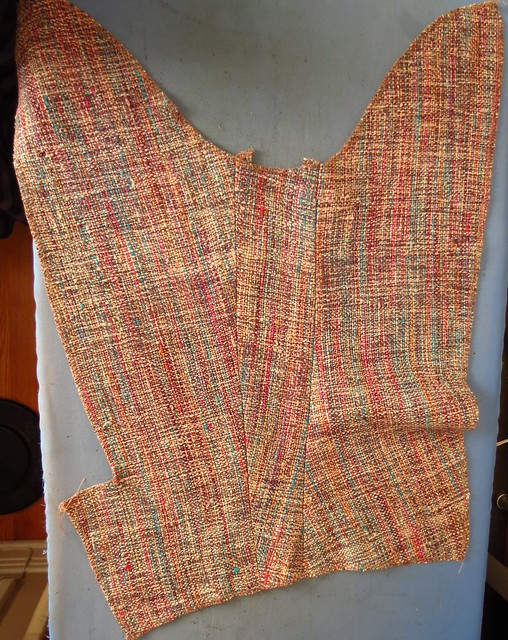